App Development Without Coding: A Practical Guide
Discover how app development without coding works in this practical guide. Learn to choose tools, design, build, and launch your own app from scratch.
App Development Without Coding: A Practical Guide
Yes, you can build a powerful, market-ready app without writing a single line of code. This is achieved using no-code development platforms, which replace complex programming languages with visual, drag-and-drop interfaces. This guide provides a step-by-step framework for turning an idea into a fully launched and monetized application. The process involves validating your idea, choosing the right platform, designing a user-friendly experience, building core features and a database, and finally, testing and launching your app.
This guide is your complete roadmap, designed to take you from a raw idea scribbled on a napkin to a fully launched, monetized app.
The New Reality of App Creation
Not long ago, the very idea of building an app was reserved for people with deep technical expertise and years of coding experience under their belts. Today, that barrier has completely crumbled. The rise of no-code platforms has opened the floodgates, empowering entrepreneurs, designers, and business owners to turn their visions into working software.
Here's a good way to think about it: traditional coding is like building a car from raw materials. You'd be welding the frame, assembling the engine piece by piece, and wiring all the electronics yourself. It's an incredible skill, but it's not for everyone.
In contrast, app development without coding is more like assembling a high-quality, pre-fabricated car kit. You still make all the critical decisions—the model, the features, the paint job—but you use intuitive tools to put expertly made components together. The end result is just as powerful, but you get there a whole lot faster.
A Growing Movement
This shift isn't just a small trend; it's a fundamental change in how software gets made. By 2025, it's predicted that around 70% of new applications developed by enterprises will be built using low-code or no-code platforms.
That's a massive jump from less than 25% back in 2020, and it's being driven by the need for speed and accessibility. This has given rise to a new wave of "citizen developers"—people without formal coding skills who can now build the exact custom apps they need. You can find more eye-opening no-code statistics and see how they're shaping the industry on UserGuiding.com.
The benefits of this modern approach are pretty hard to argue with:
- Drastically Reduced Timelines: A project that once took months of intensive coding can now be prototyped, built, and launched in weeks, sometimes even days.
- Lower Development Costs: You can sidestep the massive expense of hiring a dedicated development team, making it possible to get your project off the ground with a lean budget.
- Creative Freedom: Your vision is no longer limited by your technical skills. If you can dream it up and map it out, there's a good chance you can build it.
- Faster Iteration: Getting feedback from real users and making changes is simple and immediate. This lets you fine-tune your app and adapt to market demands in real time.
Before we dive in, let's quickly look at how these two worlds stack up.
Traditional Coding vs No-Code Development At a Glance
This table offers a quick snapshot of the key differences between the old-school way of building software and the modern no-code approach.
| Aspect | Traditional Coding | No-Code Development |
|---|---|---|
| Skill Requirement | Highly specialized (e.g., Python, Java) | Visual, logic-based, no coding needed |
| Development Speed | Slow; months to years | Fast; days to weeks |
| Initial Cost | High (developer salaries, infrastructure) | Low (platform subscription fees) |
| Flexibility | Extremely high; near-infinite customization | High, but within platform constraints |
| Maintenance | Complex and ongoing | Simplified; handled by the platform |
| Best For | Highly complex, unique enterprise systems | MVPs, internal tools, startups, small businesses |
As you can see, each has its place. But for a huge number of projects, the speed, cost, and accessibility of no-code make it the smarter path forward.
This guide is designed to be your practical, step-by-step companion. We'll walk through every stage of the process together—from figuring out if your idea has legs to picking the right tools, designing a great user interface, and finally, launching and making money from your creation. You don't need a technical background to get this done. All you need is a great idea and the drive to build it.
Validate Your App Idea Before You Build
Let's get one thing straight: a brilliant app idea is worthless if nobody actually wants it. Before you even think about touching a drag-and-drop builder, you have to confirm that you're solving a real, painful problem for a specific group of people.
This validation process is the single most important step you'll take. It's what separates successful apps from the ones that launch to the sound of crickets.
Too many aspiring creators fall in love with their solution before they truly understand the problem. They burn months building features they think are cool, only to discover their target audience couldn't care less. Validation flips that script. It forces you to get obsessive about the user and their needs first, ensuring you build something with demand baked right in.
Pinpoint Your Ideal User
You can't build for everyone. The first part of validation is getting hyper-specific about who you're helping. This means ditching vague descriptions like "small business owners" and creating a detailed user persona instead.
A user persona is just a semi-fictional character who represents your perfect customer. Give them a name, a job, goals, and most importantly, frustrations.
- Who is "Marketing Maria"? She's a 32-year-old marketing manager at a mid-sized tech company.
- What are her goals? She needs to prove the ROI of her campaigns but can't easily consolidate data from all the different platforms she uses.
- What are her pain points? She wastes over 10 hours a week manually exporting spreadsheets and feels constantly behind.
When you understand Maria's specific challenges, you can design a solution that speaks directly to her pain, making your app instantly valuable.
Conduct Smart Market Research
With your persona in hand, it's time to find where these people hang out online. Your goal isn't stuffy academic research; it's about listening to real conversations to see if the problems you've identified are actually widespread.
Dive into online communities where your ideal user lives. Think Reddit, niche Facebook Groups, or industry-specific forums. Look for recurring questions, complaints, or frustrations related to the problem your app solves. For instance, are people in the r/marketing subreddit constantly asking for tools to simplify reporting? That's a massive signal of demand.
Next, do a thorough competitor analysis. Find existing apps that are already trying to solve a similar problem. Don't be discouraged by competition—it's actually a fantastic sign that a market exists.
Analyze their user reviews, especially the bad ones. These complaints are a goldmine of information, pointing directly to feature gaps and user frustrations that your no-code app can potentially solve better.
For a deeper dive into this process, particularly for AI-driven projects, our ultimate guide to validating an AI app idea offers more advanced techniques.
Define Your Minimum Viable Product
Once you've confirmed the problem and found your audience, the final validation step is to define your Minimum Viable Product (MVP). An MVP isn't a buggy, half-baked version of your app. It is the absolute simplest, most streamlined version that solves the core problem for your target user and nothing more.
Resist the siren song of adding every feature you've ever dreamed of. For "Marketing Maria," an MVP wouldn't be a full-blown analytics suite. It might be a simple tool that connects to just two platforms (like Google Analytics and Facebook Ads) and displays one critical metric on a single, clean dashboard.
This disciplined approach gives you two massive advantages:
- Speed to Market: It lets you launch quickly and start getting feedback from real, paying customers.
- Reduces Waste: You avoid pouring time and money into building features that nobody ends up using.
By validating your idea with a sharp user persona, targeted market research, and a lean MVP scope, you lay a rock-solid foundation for your entire project. This ensures your app development without coding journey starts with a destination people actually want to reach.
Choosing the Right No-Code Platform
This is probably the single most important technical decision you'll make. Picking the right no-code platform is like choosing the engine for your car—it determines how fast you can go, how much you can carry, and how reliable your journey will be. The market is packed with powerful tools, each with its own personality and strengths. Your choice here will directly shape your app's capabilities, development speed, and future potential.
Getting this right means matching a platform's core DNA to your app's specific needs. Are you building a complex web app with custom data structures, like a two-sided marketplace? Or are you aiming for a simple, slick mobile app that does one thing really well? The answer will point you in the right direction.
Comparing the Top Contenders
Let's break down three of the heavyweights in the no-code space. Each one is built for a different kind of job, so understanding their sweet spots is crucial.
- Bubble: If you're building a serious, complex web application, Bubble is the undisputed king. Think SaaS products, social networks, or internal dashboards. It gives you a blank canvas with maximum control over design, custom databases, and intricate workflows. If you need to connect to third-party APIs, Bubble's power is unmatched.
- Adalo: Need an app for the Apple App Store and Google Play Store? Adalo is your go-to. It's designed specifically for building native mobile apps and simplifies the process with a drag-and-drop interface and pre-built components. It's much simpler than Bubble, which means you can get a mobile app into users' hands much faster.
- Glide: Got your data sitting in a Google Sheet or Airtable? Glide is the fastest way to spin that data into a beautiful, functional app. It's perfect for building simple internal tools, event apps, employee directories, or inventory trackers. You can literally go from a spreadsheet to a working app in a couple of hours.
Keep in mind that choosing a platform isn't just about the features on a checklist. You're buying into an entire ecosystem. Dig into the community forums, see how many tutorials are out there, and check out the template marketplace. When you inevitably get stuck at 2 a.m., that support system is what will get you through it.
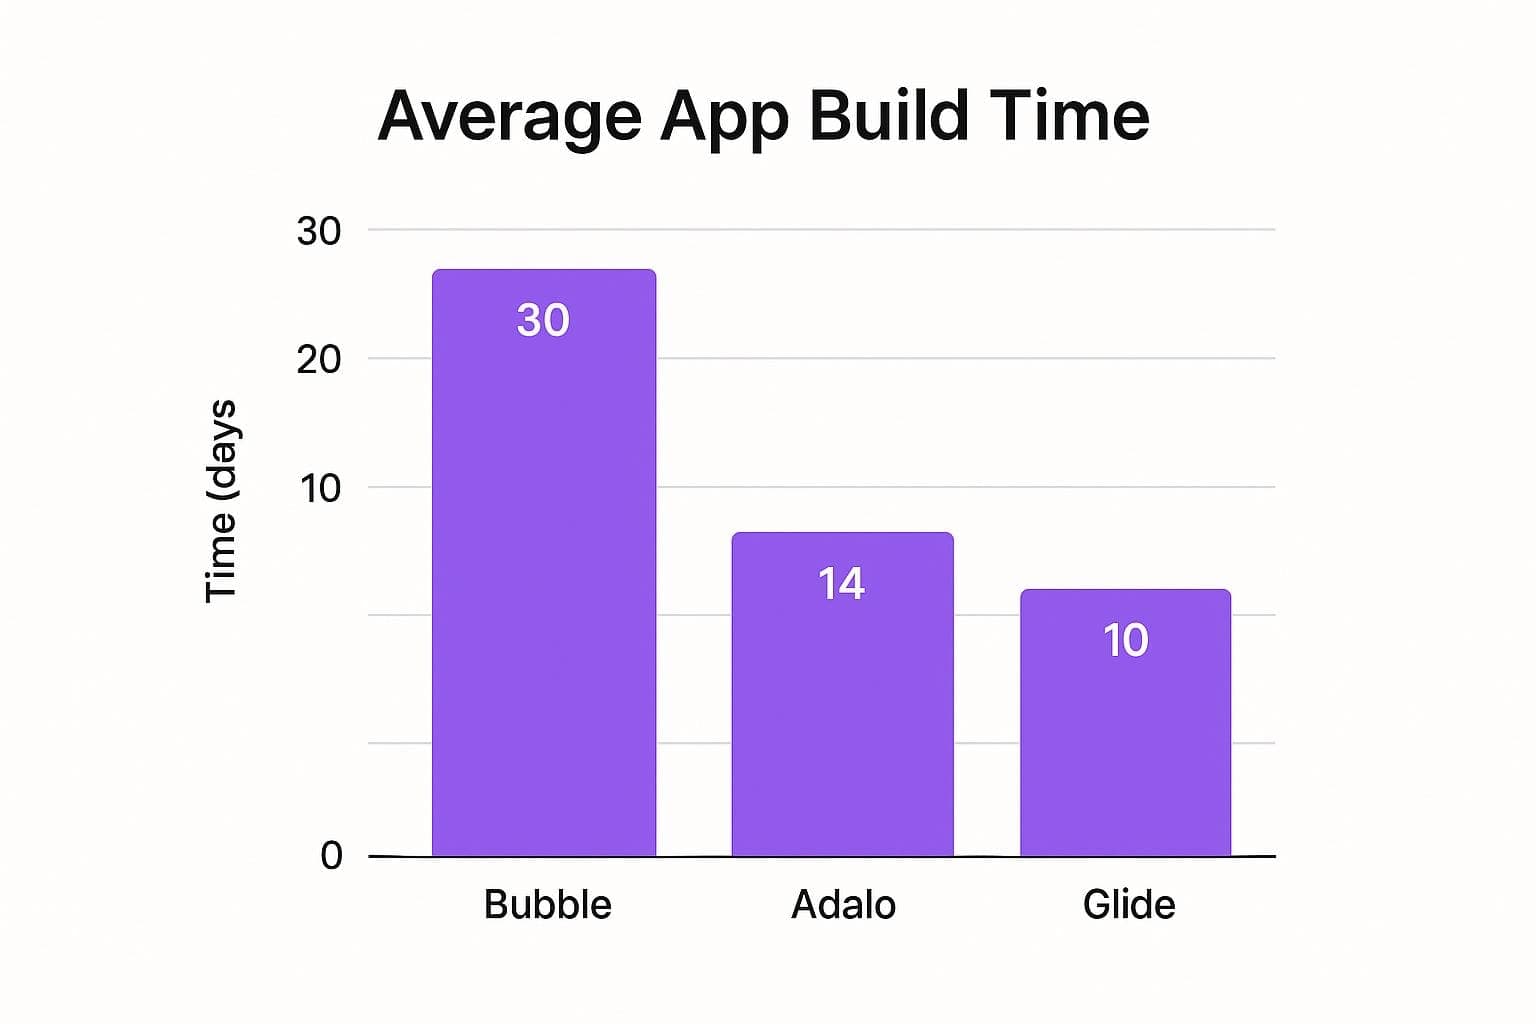
This chart really drives home the trade-off between speed and power.

As you can see, Glide will get you a simple MVP the fastest, but Bubble's deeper capabilities require a bigger time investment upfront.
Evaluating Based on Key Criteria
Don't get hypnotized by flashy marketing. To make a smart choice, you need a clear framework. Focus on these core factors that will actually make or break your project.
Top No-Code Platform Comparison
Before diving deeper, here's a quick side-by-side look at how these platforms stack up. This should give you a high-level view to start narrowing down your options based on what you're trying to build.
| Platform | Best For | Key Features | Pricing Model |
|---|---|---|---|
| Bubble | Complex web apps, SaaS, marketplaces | Visual workflow editor, custom database, API integrations, pixel-perfect design | Subscription Tiers |
| Adalo | Native mobile apps (iOS & Android) | Drag-and-drop components, app store publishing, simple database actions | Subscription Tiers |
| Glide | Data-driven apps from spreadsheets | Connects to Google Sheets/Airtable, fast setup, beautiful pre-built layouts | Freemium & Tiers |
This table highlights the core purpose of each tool. Now, let's explore the criteria behind these recommendations so you can make a truly informed decision.
Scalability and Performance
Think about the future. A tool that's perfect for your first 100 users might buckle under the pressure of 10,000. Look into the platform's database capacity, workflow limits, and server power on their different pricing plans. Bubble, for instance, is built on AWS and is designed for scale, whereas Glide is better suited for projects with more contained data and user loads.
Learning Curve and Ease of Use
Be honest about your own technical comfort level. Glide is famous for its gentle learning curve; you can have a working app by the end of the afternoon. Adalo is a happy medium. Bubble, however, is a beast. It's incredibly powerful, but you need to be ready to put in the time to really learn its logic engine.
Here's a look at Bubble's visual editor, which gives you a sense of both its power and its complexity.
The level of control you have over every element and workflow is amazing, but it also shows why it's a tool for building serious, scalable web applications.
Integration Capabilities
Your app won't live on an island. It will need to talk to other services for things like payments (Stripe), analytics (Google Analytics), or sending texts (Twilio). Check each platform's list of native integrations and, more importantly, its ability to connect to any external API. A powerful API connector, like the one in Bubble, opens up a world of possibilities.
If your app idea involves AI, this step is especially critical. Getting expert tech stack recommendations can save you a world of hurt, since connecting to AI models requires specific capabilities that not all platforms handle well. Choosing the right platform now will prevent a ton of headaches down the road.
Designing a User-Friendly Experience

Here's a hard truth: a powerful app with a confusing design is like a sports car with no steering wheel. It might be impressive under the hood, but it's completely useless to the person trying to drive it. Great design is what makes an app intuitive, enjoyable, and something people actually want to keep using.
This is where user experience (UX) and user interface (UI) design become the most important parts of your app development without coding journey.
Don't panic—you don't need to be a professional designer to get this right. The entire goal is to think from your user's perspective at every single step. UX is all about the overall feel and logic of the app, while UI focuses on the visual bits like buttons, fonts, and colors. Get the logic right first, then make it look good.
Sketching Your App's Blueprint
Before you even think about picking a color palette or a cool font, you need a blueprint. In the app world, this means creating wireframes and mapping out user flows. This is the architectural phase where you figure out how everything connects.
A user flow is just a simple map showing the path a user takes to get something done. For instance, a user flow for signing up might look like this: Home Screen -> Click 'Sign Up' -> Fill Out Form -> Click 'Submit' -> View Welcome Screen. Mapping these out forces you to think through the journey and ensures you don't build dead ends or confusing loops.
Once the flows make sense, you can create wireframes. These are basic, black-and-white sketches of each screen. Think of them as simple outlines focusing only on structure and layout. Where will the buttons go? Where does the main text sit? Forget about design for now; this is all about pure function.
This initial sketching phase is where you'll catch 80% of potential usability problems. It's far cheaper and faster to erase a line on a sketch than it is to rebuild a fully designed screen in your no-code tool.
There are fantastic digital tools to help with this. You don't need to be an expert to use something like Figma, a popular web-based design tool that even non-designers use for wireframing. It lets you visually arrange screens and draw connections between them, creating an interactive prototype before any real development begins.
Mastering the Basics of UI Design
With a solid blueprint in hand, you can now shift your focus to making the app look professional. The great news is that most no-code platforms do a lot of the heavy lifting for you with their pre-built component libraries. You don't have to design a button from scratch; you just drag one onto your canvas.
Your job is to make smart, consistent choices. Here are three core areas to concentrate on:
- Color Palette: Stick to a simple and consistent color scheme. A good rule of thumb is the 60-30-10 rule: 60% for a dominant, neutral color; 30% for a secondary, complementary color; and 10% for a single accent color. Save that accent for important calls-to-action, like "Buy Now" or "Sign Up" buttons, to make them pop.
- Typography: Choose two fonts at most—one for your headings and one for your body text. The top priority is making sure your text is readable with plenty of contrast against the background. Google Fonts is a fantastic free resource for finding professional font pairings.
- Consistency: This is the golden rule of UI. Every button that performs the same action should look the same. Every screen should follow a similar layout. This consistency builds familiarity and makes your app feel intuitive and reliable, not chaotic.
By combining a thoughtful user flow with clean, consistent UI principles, you can create an experience that feels professional and is genuinely easy to use, setting your no-code application up for success.
Building Your App's Features and Database
With a solid design blueprint in hand, it's time to bring your static vision to life. This is where the real power of no-code app development comes into play, letting you build the engine of your product with visual tools instead of lines of code. And it all starts with the database—the backbone that will hold all your app's critical information.
Think of your database as a set of smart, interconnected spreadsheets. Each "sheet," or data table, is built to hold a specific type of information—users, products, blog posts, you name it. The real magic happens when you create relationships between these tables.
For instance, you might have one table for Users and another for Orders. By linking them, you tell the system that every Order belongs to a specific User. This simple connection lets you build features like a customer's order history page with just a few clicks. No-code platforms make this completely visual: you define your tables, set up fields like Name, Email, or Price, and then just draw the connections between them.
Constructing Core App Functions
Once your database is structured, you can start building the features your users will actually interact with. This is done by creating workflows—logical, step-by-step instructions that tell your app what to do when a user performs an action. It's a bit like building with digital LEGOs, where each piece is an action or a condition.
These workflows are the heart of your app. Let's look at a few essential features you can build this way:
- User Authentication: The first thing most apps need is a way for people to sign up and log in. You can create a workflow that kicks off when a user clicks "Sign Up." This workflow takes the info from the form, creates a new entry in your
Userstable, and then logs them into their new account. - Data Submission Forms: Imagine you're building a job board. You'll need a form for companies to post new listings. A workflow would capture all the submitted data—job title, description, salary—and save it as a new entry in your
Job Postingstable. - Dynamic Content Displays: This is what makes an app feel alive. Instead of static pages, you can create dynamic lists that pull information straight from your database. For that job board, you could design a "repeating group" that automatically displays every single entry from the
Job Postingstable, creating a browseable list that updates in real-time as new jobs are added.
The key takeaway is that workflows run on a simple "When this happens, do that" logic. For example: When a user clicks the 'Like' button on a post, do find that specific post in the database and add +1 to its 'Like Count'. This intuitive approach lets you build surprisingly complex features without ever touching code.
Integrating with External Services
Modern apps rarely work in a bubble. They often need to talk to other services to offer a complete experience—processing payments, showing maps, or sending emails. These connections are made possible through Application Programming Interfaces (APIs), and historically, working with them was strictly a developer's job.
Not anymore. Today's no-code platforms have made API integration accessible to everyone. They offer visual tools that let you connect to other services by simply plugging in the right credentials and telling the system what data you want to send or receive.
For example, connecting your app to Stripe for payments is a classic need. Instead of writing complex server-side code, your no-code platform likely has a pre-built plugin or a visual API connector. You'd set up a workflow so that when a user clicks "Checkout," it sends the product details and price over to Stripe's API. Stripe handles the secure transaction and sends a confirmation back to your app, which you can use to update the order status in your database.
Similarly, you could integrate with services like:
- Google Maps: To display a location from your database on an interactive map.
- OpenAI: To send a user's question to a GPT model and display the AI-generated answer.
- Twilio: To send automated SMS notifications to users when something important happens in your app.
This ability to seamlessly tap into powerful third-party services is what can elevate your project from a simple tool to a robust, market-ready application. It allows you to use world-class infrastructure without needing a team of engineers, truly leveling the playing field for creators.
Testing and Launching Your Application
Getting your app across the finish line is about more than just building the last feature. It's a critical cycle of testing it until it's solid, deploying it to the world, and then listening intently to your first users to figure out what comes next.
This isn't just about squashing bugs, though you'll do plenty of that. It's about making sure the app is actually intuitive and solves the problem you set out to fix. After all, the most brilliant features are useless if the app is confusing or crashes when someone tries to use them.
The Crucial Role of User Testing
Before you even think about going live, you absolutely have to see how your app behaves in the hands of real people. You're too close to the project; you know exactly how it's supposed to work, which paradoxically makes you the worst person to test its usability.
This is where User Acceptance Testing (UAT) comes in, and it's non-negotiable. The idea is to find a small group of people who fit your ideal customer profile and give them a few simple tasks to complete in the app.
- Task Example: "Sign up for a new account and create your first project."
- Observation: The key is to watch them without offering any help. Where do they get stuck? What button do they miss? Do they look confused? This kind of real-world feedback is pure gold.
UAT isn't about asking them if they like the color of your buttons. It's about observing if they can actually use the app to get something done. The insights you gather here will expose awkward workflows and hidden bugs before they have a chance to frustrate paying customers.
Preparing for Deployment
Once you've smoothed out the rough edges you found during testing, it's time to get ready for the main event. The actual process of deploying your app will look a little different depending on what kind of app you've built.
For web applications, this is usually pretty straightforward. On a platform like Bubble, it often just means upgrading to a paid plan so you can connect your own custom domain. This is the step that turns your project from a clunky development URL into a professional, branded web presence.
For mobile apps built with a tool like Adalo, the path is a bit more involved. You'll need to prepare your app for submission to both the Apple App Store and the Google Play Store. This means creating developer accounts on both platforms, generating screenshots, writing a compelling app description, and navigating each store's specific submission rules.
Life After Launch
Here's a secret: launching your app isn't the end of the journey. It's the beginning of the real work. What you do after launch is what separates a successful app from a forgotten one. Your focus now shifts to monitoring, gathering feedback, and planning your next move.
Connecting analytics tools from day one is essential. This lets you track critical metrics like how many people are signing up, which features they use most, and how many stick around. The data tells a story about what parts of your app people truly value and where they might be dropping off.
As you start gathering this feedback, you'll naturally start thinking about how to make it profitable. For a deeper look, our guide on how to monetize mobile apps is packed with actionable strategies to help turn your project into a real business.
Common Questions About No-Code Development
As you start exploring what's possible with no-code tools, a few big questions almost always come up. It's only natural. Let's tackle some of the most common ones head-on to clear up any confusion before you dive in.
Can I Build a Complex App?
The short answer? Absolutely. The idea that no-code is just for simple landing pages or basic internal tools is seriously outdated.
Modern platforms like Bubble are incredibly powerful, capable of building sophisticated applications from the ground up. We're talking about full-blown social networks, customer relationship managers (CRMs), and even two-sided marketplaces that connect buyers and sellers.
The real trick is learning to think within the platform's visual logic. It's a different way of working, but once it clicks, you can create apps with custom databases, complicated user workflows, and deep integrations with third-party APIs. The ceiling is much, much higher than most people realize.
Do I Own the App I Build?
This is a critical one, and the answer is a bit nuanced. You 100% own your intellectual property. That includes your unique idea, the UI/UX design you create, your branding, and—most importantly—all of the user data your app generates and collects. That's all yours.
However, you don't own the underlying code that makes the no-code platform run. Think of it this way: your application is built on their infrastructure, so it needs to stay on their service to function. You can't just download the source code and host it on your own server.
Most platforms do, however, provide robust tools for exporting your data, giving you an exit strategy if you ever decide to move on or rebuild elsewhere.
It's like renting a state-of-the-art workshop. You own everything you create inside it—the designs, the products, the customer list—but the building and the high-tech tools belong to the landlord.
Is No-Code Development Really Free?
For getting started, yes. Most no-code platforms offer generous free plans that are perfect for learning the ropes, building out a prototype, and even creating a fully functional version of your app.
But once you're ready to launch to the public and get serious, you'll need to jump on a paid plan. These subscriptions are what unlock the professional-grade features you'll need to run a real business.
Typically, paid plans will give you:
- The ability to use a custom domain for your web app.
- More database capacity and file storage.
- Increased server power to handle more users without slowing down.
- The option to publish native apps to the App Store and Google Play.
The good news is that these costs usually scale with your usage, which makes it a really affordable way for new creators and bootstrapped founders to get off the ground.
--- At GPT Wrapper Apps, we help you skip the guesswork by providing validated, market-ready AI app ideas. Each one comes with a detailed product requirement document to get you building faster. Check out our curated ideas at https://gptwrapperapps.com and turn your vision into a real product.
Found this helpful?
Share it with others who might benefit.
About Gavin Elliott
AI entrepreneur and founder of GPT Wrapper Apps. Expert in building profitable AI applications and helping indie makers turn ideas into successful businesses. Passionate about making AI accessible to non-technical founders.